
The MSI installation may be automated using Windows Installer (msiexc) via command line or MST using the MSI property names (must be uppercase).
The MSI will need to be executed with local administrator privileges to install.
For example:
msiexec /i RedOffice.Install.Office64.msi/qb CONNECTURI=”https://myserver/test/service.svc”
Use the “/qn” parameter for a silent (no user interface) install or “/qb” for a quiet (just progress) install. Set “ALLUSERS=1” to install for all users on the machine.
NOTE: The CONNECTURI is not required for a valid installation of the MSI. These can be updated within the Add-in itself.
CONFIGURATION
In order for RedOffice to operate correctly the Connect URI must be set.
Connect URI – This is the URI to the Connect EDRMS web service and is utilised for communicating to the EDRMS.
There are a number of ways that these 2 values can be set:
- On installation using the MSI Properties
- Distributing a configuration file
- From the Settings within the application itself
CONFIGURATION WITH MSI PROPERTIES
The installation MSI includes this property:
- CONNECTURI
This can be provided as part of the installation process to automate the configuration of RedOffice.
Example: msiexec /i RedOffice.Install.Office64.msi/qb CONNECTURI=”https://myserver/redoffice-test/EDRMSService.svc”
Please note, that installation of the MSI can be completed without these values. Please refer to the Automated Installation section above for more detail on installation.
Where this method is utilised for configuration the configuration information will be written to the registry.
HKEY_LOCAL_MACHINE\SOFTWARE\RedmanSolutions\RedOffice
String Value Name: ConnectURI
CONFIGURATION WITH CONFIGURATION FILE
RedOffice will generate a local configuration file at the following location when settings have been updated in the application:
%appdata%\RedOffice\RedOffice.config
(e.g. C:\Users\myusername\AppData\Roaming\RedOffice\RedOffice.config)
This file can be used to push out a configuration file to other workstations
1. Install RedOffice on a workstation
2. Run RedOffice Settings from the Windows Start Menu
3. Configure the setting as required (refer to the next section)
4. Click on OK to save and close the RedOffice Settings
5. Take a copy of the RedOffice.config file
6. Edit the file to remove any value in the “EdrmsUser” if it exists
7. This file can then be pushed out to user’s workstations
a. For 32-bit installations – push to %ProgramFiles(x86)%\Redman Solutions\RedOffice\
b. For 64-bit installations – push to %ProgramFiles%\Redman Solutions\RedOffice\
8. RedOffice will read the RedOffice.config file from %ProgramFiles% and create a user version in %AppData%\RedOffice which is where the application will then read from.
CONFIGURATION AND SETTINGS WITHIN THE REDOFFICE ADD-IN
Configuration of the RedOffice Add-ins can be completed by running RedOffice Settings from the Windows Start Menu

Or configured within a Microsoft Office application such as Word from the Help – Settings menu.
Click on the Settings button to change user settings.

Note: Configuration in this manner will generate a RedOffice.config file within the %appdata%\RedOffice folder.
EDRMS Connect Server
Service URI: This will be supplied by Redman Solutions on installation.
If the settings are changed the Office application will need to be restarted after clicking OK for these settings to take effect.
Office Client
Auto Connect as User: This will be checked if the user checked the “Remember me” option when prompted for user’s name and password. Uncheck to show the prompt next time defaulting to the user. Click Forget to remove the default user.
Note: This setting will not be applicable when using webform authentication to the EDRMS.
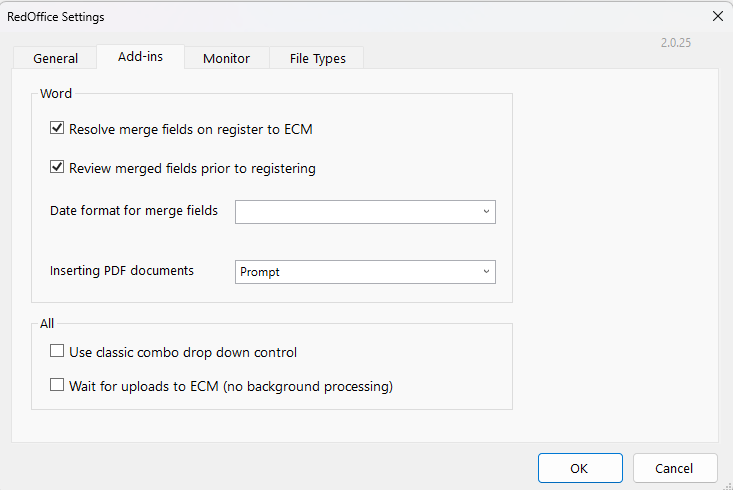
Resolve merge fields on save to EDRMS: Check this option for Word and Excel to look for and replace merge field tokens when saving a document to the EDRMS. Uncheck to keep the tokens in the document (eg. For template documents).
Date format for merge fields: Select or enter the format for use for merge field date values. It will show a sample of the date format using the current date time. Select from the drop-down list for common formats. Use “d” (short date only), “g” (short date and time) or “f” (long date and time) for region aware formats set by the Windows Regional Settings (Control Panel). Hover to see the tool tip to assist in creating your own custom format.
Refresh Language
This button will only be enabled if the RedOffice client has an active connection to the EDRMS. This is typically only when the settings dialog is opened from within the Office application once a connection has been made. It will download the language terminology file again from the DCP Connect server.
Clear local cache
This will delete any cached list, search history or document stored locally on the client machine to expediate items repeatedly retrieved from the EDRMS. It will force all items to be retrieved again when next required. If there is an active connection to the EDRMS (indicated by the Refresh Language button being enabled) then it will only clear the cache of the active connection. If there is no active connection (typically when run from Windows Start), then it will clear all prior connection caches.
CONFIGURATION UPDATES
When a user access RedOffice it currently looks for configuration information in the following order:
1. %AppData%\RedOffice
2. %ProgramFiles%\Redman Solutions\RedOffice\ or %ProgramFiles(x86)%\Redman Solutions\RedOffice\
3. Registry
a. Local User Install: HKEY_CURRENT_USER\Software\RedmanSolutions\RedOffice
b. All User Install: HKEY_LOCAL_MACHINE\Software\RedmanSolutions\RedOffice
This should be taken into account if a site wishes to change these values in the future for existing installations.
Please contact Redman Solutions if further information is required in relation to configuration updates.
SAMPLE CONFIGURATION FILE
A sample roll-out of specific settings can include pushing out a RedOffice.config file as well as registry settings.
Only certain configuration settings can be pushed out in this way.
For example, let’s say we want to push out the following settings:

We can push out the file
%appdata%\RedOffice\RedOffice.config
(e.g. C:\Users\myusername\AppData\Roaming\RedOffice\RedOffice.config)
DCPConnectURI=http://redoffice.redmansolutions.com/RedOffice/Prod/EDRMSService2.svc
HideOnUnfocus=True
KeepRecents=Until removed
ResolveFields=True
ReviewFields=False
DateFormat=
AllowInsert=True|PDF=Prompt
The “Start RedOffice Drawer with Windows” setting can only be pushed out by this registry settings:
HKEY_CURRENT_USER\SOFTWARE\Microsoft\Windows\CurrentVersion\Run
Name: RedOffice.Worker
Type: REG_SZ
Data: "C:\Program Files (x86)\Redman Solutions\RedOffice\RedOffice.Worker.exe" monitor
The MSI will need to be executed with local administrator privileges to install.
For example:
msiexec /i RedOffice.Install.Office64.msi/qb CONNECTURI=”https://myserver/test/service.svc”
Use the “/qn” parameter for a silent (no user interface) install or “/qb” for a quiet (just progress) install. Set “ALLUSERS=1” to install for all users on the machine.
NOTE: The CONNECTURI is not required for a valid installation of the MSI. These can be updated within the Add-in itself.
CONFIGURATION
In order for RedOffice to operate correctly the Connect URI must be set.
Connect URI – This is the URI to the Connect EDRMS web service and is utilised for communicating to the EDRMS.
There are a number of ways that these 2 values can be set:
- On installation using the MSI Properties
- Distributing a configuration file
- From the Settings within the application itself
CONFIGURATION WITH MSI PROPERTIES
The installation MSI includes this property:
- CONNECTURI
This can be provided as part of the installation process to automate the configuration of RedOffice.
Example: msiexec /i RedOffice.Install.Office64.msi/qb CONNECTURI=”https://myserver/redoffice-test/EDRMSService.svc”
Please note, that installation of the MSI can be completed without these values. Please refer to the Automated Installation section above for more detail on installation.
Where this method is utilised for configuration the configuration information will be written to the registry.
HKEY_LOCAL_MACHINE\SOFTWARE\RedmanSolutions\RedOffice
String Value Name: ConnectURI
CONFIGURATION WITH CONFIGURATION FILE
RedOffice will generate a local configuration file at the following location when settings have been updated in the application:
%appdata%\RedOffice\RedOffice.config
(e.g. C:\Users\myusername\AppData\Roaming\RedOffice\RedOffice.config)
This file can be used to push out a configuration file to other workstations
1. Install RedOffice on a workstation
2. Run RedOffice Settings from the Windows Start Menu
3. Configure the setting as required (refer to the next section)
4. Click on OK to save and close the RedOffice Settings
5. Take a copy of the RedOffice.config file
6. Edit the file to remove any value in the “EdrmsUser” if it exists
7. This file can then be pushed out to user’s workstations
a. For 32-bit installations – push to %ProgramFiles(x86)%\Redman Solutions\RedOffice\
b. For 64-bit installations – push to %ProgramFiles%\Redman Solutions\RedOffice\
8. RedOffice will read the RedOffice.config file from %ProgramFiles% and create a user version in %AppData%\RedOffice which is where the application will then read from.
CONFIGURATION AND SETTINGS WITHIN THE REDOFFICE ADD-IN
Configuration of the RedOffice Add-ins can be completed by running RedOffice Settings from the Windows Start Menu
Or configured within a Microsoft Office application such as Word from the Help – Settings menu.
Click on the Settings button to change user settings.
Note: Configuration in this manner will generate a RedOffice.config file within the %appdata%\RedOffice folder.
EDRMS Connect Server
Service URI: This will be supplied by Redman Solutions on installation.
If the settings are changed the Office application will need to be restarted after clicking OK for these settings to take effect.
Office Client
Auto Connect as User: This will be checked if the user checked the “Remember me” option when prompted for user’s name and password. Uncheck to show the prompt next time defaulting to the user. Click Forget to remove the default user.
Note: This setting will not be applicable when using webform authentication to the EDRMS.
Resolve merge fields on save to EDRMS: Check this option for Word and Excel to look for and replace merge field tokens when saving a document to the EDRMS. Uncheck to keep the tokens in the document (eg. For template documents).
Date format for merge fields: Select or enter the format for use for merge field date values. It will show a sample of the date format using the current date time. Select from the drop-down list for common formats. Use “d” (short date only), “g” (short date and time) or “f” (long date and time) for region aware formats set by the Windows Regional Settings (Control Panel). Hover to see the tool tip to assist in creating your own custom format.
Refresh Language
This button will only be enabled if the RedOffice client has an active connection to the EDRMS. This is typically only when the settings dialog is opened from within the Office application once a connection has been made. It will download the language terminology file again from the DCP Connect server.
Clear local cache
This will delete any cached list, search history or document stored locally on the client machine to expediate items repeatedly retrieved from the EDRMS. It will force all items to be retrieved again when next required. If there is an active connection to the EDRMS (indicated by the Refresh Language button being enabled) then it will only clear the cache of the active connection. If there is no active connection (typically when run from Windows Start), then it will clear all prior connection caches.
CONFIGURATION UPDATES
When a user access RedOffice it currently looks for configuration information in the following order:
1. %AppData%\RedOffice
2. %ProgramFiles%\Redman Solutions\RedOffice\ or %ProgramFiles(x86)%\Redman Solutions\RedOffice\
3. Registry
a. Local User Install: HKEY_CURRENT_USER\Software\RedmanSolutions\RedOffice
b. All User Install: HKEY_LOCAL_MACHINE\Software\RedmanSolutions\RedOffice
This should be taken into account if a site wishes to change these values in the future for existing installations.
Please contact Redman Solutions if further information is required in relation to configuration updates.
SAMPLE CONFIGURATION FILE
A sample roll-out of specific settings can include pushing out a RedOffice.config file as well as registry settings.
Only certain configuration settings can be pushed out in this way.
For example, let’s say we want to push out the following settings:
We can push out the file
%appdata%\RedOffice\RedOffice.config
(e.g. C:\Users\myusername\AppData\Roaming\RedOffice\RedOffice.config)
DCPConnectURI=http://redoffice.redmansolutions.com/RedOffice/Prod/EDRMSService2.svc
HideOnUnfocus=True
KeepRecents=Until removed
ResolveFields=True
ReviewFields=False
DateFormat=
AllowInsert=True|PDF=Prompt
The “Start RedOffice Drawer with Windows” setting can only be pushed out by this registry settings:
HKEY_CURRENT_USER\SOFTWARE\Microsoft\Windows\CurrentVersion\Run
Name: RedOffice.Worker
Type: REG_SZ
Data: "C:\Program Files (x86)\Redman Solutions\RedOffice\RedOffice.Worker.exe" monitor