Resolve - Azure Single Sign On Setup
Detailed steps for your IT team to configure Azure ADFS integration.
Add a non-gallery application
Configure App
Add User for Testing
Set up Single Sign-On
- Sign in to the Azure portal using your Microsoft identity platform administrator account
- Go to Azure Active Directory
- Select Enterprise applications > All applications and click New application button
- Click Create your own application button. The Create your own application page appears

- Select Non-gallery application. The Add your own application page appears
- Enter the display name for your new application. i.e. Resolve
- Choose the option Integrate any other application you don't find in the gallery (Non-gallery)
- Select Create button. The application Overview page opens
Configure App
Add User for Testing
- Under Getting Started, choose Assign users and groups

- Click Add user/group button and select the User or Group you would like to have access to the Resolve app
- When complete, return to the Overview > Getting Started section of the Resolve Application
Set up Single Sign-On
- Under Getting Started, choose Set up single sign on

- Click on SAML option
- Basic SAML Configuration
- Identifier (Entity ID): resolve.red
- Reply URL (Assertion Consumer Service URL): https://<client_Id>.resolve.red/admin/saml/assertionconsumerservice.aspx
https://<client_Id>.resolve.red/BoardView/SAML - Leave all other options blank

- User Attributes & Claims
- Map attributes to match screenshot below(Must be exactly the same as below)

- Map attributes to match screenshot below(Must be exactly the same as below)
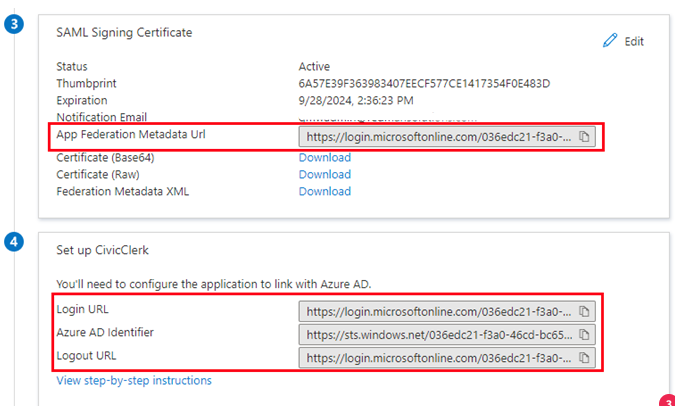
- Copy the following info from sections 3 & 4, and send to Redman Solutions to complete the setup
- App Federation Metadata URL
- Login URL
- Azure AD Identifier
- Logout URL

