Resolve - Table Options
How to add or format tables within Item Report or other editable content fields in Resolve. This guide may be useful to report authors, responsible for creating content.
Prerequisites: This article applies to Resolve Admin portal (https://CLIENTNAME.resolve.red/admin/) users, such as Report Writers, with permissions to edit report or other content fields.
HOW TO ADD A TABLE (Skip here for EDITING AND FORMATTING TABLES)
Navigate to the report or other content field where a table is to be added, then click into the text field, which will present the editor toolbar ribbon.

Click the Table toolbar icon and then select the desired number of cells as required 

This will add your table to the position where your cursor was in the field, set to maximum page width (100%).
Click into a Table cell to start populating content, which will present the table specific toolbar options as shown below. See following section on editing and formatting.
EDITING AND FORMATTING TABLES
Adjust Table / Column width - Hover mouse pointer over a column or table border to see the ![]() option, then click to drag the border to the desired size.
option, then click to drag the border to the desired size.

Table Toolbar Ribbon options - See below table formatting buttons and their function.
| Buttons | Details |
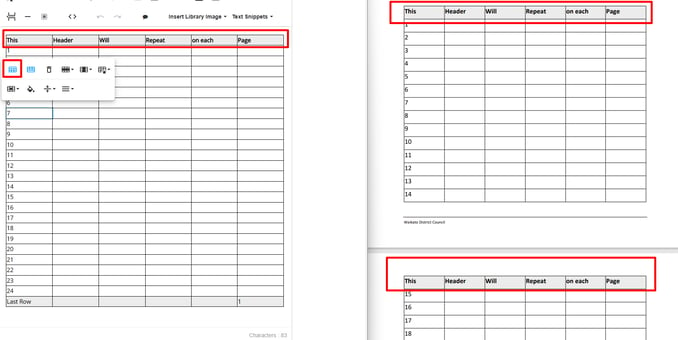
| Adds a Header to the table* | |
| Adds a Footer to the table* | |
| |
Remove the entire table |
| |
Insert row above, below or delete |
| Insert Column before, after or delete | |
| Set table styles, Dashed border, Alternate row highlighting, Border all cells or Border table only | |
| Merge or Split cells | |
| Add Background colours to your cells | |
| Set Vertical alignment for cells | |
| Set Horizontal alignment for cells | |
| Add Cell Styling, based on formats preset in related Meeting Type |
* Note: When using the Header/Footer option, The header and/or footer will be added on all pages that the table is on.
Example:

- Click into first cell, then left-click (hold) moving in the required direction (Up, Down, Left or Right), to highlight all required cells. Use a ribbon button or keyboard shortcut (e.g. Ctrl + B for "bold text") to apply required formatting. In the below example, the cells were selected from top to bottom in the column, then the Cell Background button will be used to apply cell colour.

- Where you have a need to change text formatting in a group of cells, using keyboard arrow keys makes it easy to highlight text for this purpose.
- Within the cell where you want to start, double-click into the middle of the cell text, which will highlight the text in full, as shown below.

- Hold down the [Shift] and [Ctrl] key, then ◄Left, Right►, ▲Up or Down▼ arrow keys as required, to select text in adjacent cells. In the below example, Shift+Ctrl held, then ► tapped repeatedly to select text in the whole row. After which, the editor ribbon Underline option was used to apply underline format to all the selected text.

See brief video following, which demonstrates the above Keyboard Arrow Key method in use.
Tips:
- Avoid adjusting a right-hand Table border to >100%, as this may cut off the table when generating the PDF version of your report
- When including lots of content in a report field or if adding and formatting a table, you may find the 'Full screen'
 option (main editor toolbar) helpful.
 - When using the Arrow Keys method to select text in multiple cells, just holding down the Shift key (instead of Shift+Ctrl), then tapping the appropriate arrow key (◄Left, Right►), will select and highlight text one character at a time.
